
This article will give you ways to find the ip address of the vulnerable /victim machine in your hacking lab environment in your network. A reader of my blog recently asked me to write about CTF challenges from very basics. I am really glad to get a suggestion. So, here is what you asked for.
For this article, I am using :
- VirtualBox, It’s free and works same as VMware.
- The vulnerable machine is vulnix
- Attacking machine will be Kali
For VMWARE users: http://www.anonhack.in/2018/06/part-2-finding-the-ip-address-of-your-victim-in-your-vmware-hacking-lab-network/
Let’s get on to it!
Bridged Mode in VirtualBox:
Before starting both the machines, Change the network adapter settings as bridged for both the machines, to do this follow the steps below:

Right Click on virtual machine and select settings.

Go to the Network on the sidebar and Select Bridged Adapter. Once you do that select the adapter that you use. My Machine uses the below adapter so I selected this.

Do the same to your kali machine.
***NOTE: Do this to both machines, the vulnerable machine and the Kali machine, so they are in the same network.
Once this is done, start both the machines.
In your attacking machine [KALI in my case], open terminal.
Type ifconfig:

This is the Internal IP address given to your machine. Now we have to find the IP of the machine that we want to attack and it exist in the same network as ours. There are two ways through which I do this:
- Netdiscover command
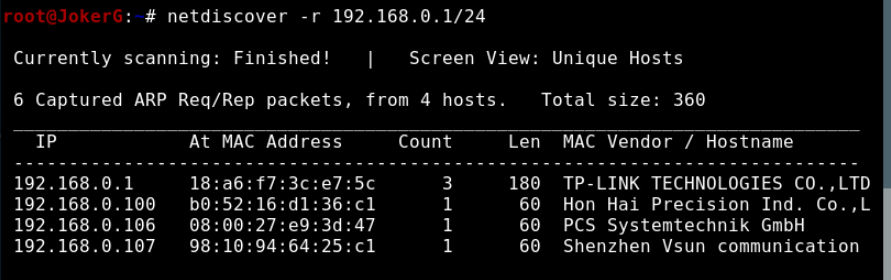
use the command: netdiscover -r 192.168.0.1/24
Explanation: -r flag is used to define the range that you want to sweep. Here our netmask is 255.255.255.0 and address is 192.168.0.109. So 24 bits are up. So we defined 192.168.0.1/24 After this, you can use nmap to find which one is your victim machine.
 - Nmap Command
Use the command: nmap 192.168.0.1/24
Explanation: we are sweeping the our subnet hosts.


Finding IP in a NAT environment:
To use NAT in Virtualbox, follow the steps below:
Go to the preference, to activate NAT connection.
When you go to Preference, you will see a screen like this. Click on the Side green Icon which says Adds new NAT network.

Once you click on Adds new NAT network, you will see this window, It’s automatically there, so You don’t have to change anything, all you have to do is make it active by clicking OK.

Click Ok and then change the settings of both of your virtual machines. Go to settings like before:

Go to settings and Go to networks ad Change the network adapter to NAT network.
Change the Name to NatNetwork,[The once we just activated in preferences]. Change the Adapter Type to PCnet-FAST III – why? because it works with every OS and it is default. Click OK.

Make the above changes to both Kali and Vulnerable machine.
They are on same network and we can start them.
Type ifconfig on KALI to know the IP address and subnet you are on:

Now, We need to find the victim’s IP address via KALI, We again have my two ways:
- Netdiscover command
use the command: netdiscover -r 10.0.2.1/24
Explanation: -r flag is used to define the range that you want to sweep. Here our netmask is 255.255.255.0 and address is 192.168.0.109. So 24 bits are up. So we defined 10.0.2.1/24
- Nmap Command
Use the command: nmap 10.0.2.1/24
Explanation: we are sweeping the 255 hosts.

That’s all you have to do to find the Victim Machine in your hacking lab.